There are chili recipes you make when you’re in a hurry, and then there are recipes like this one—built slowly, layer by layer, for deep, rich flavor.
This homemade chili is all about patience and technique, starting with soaked beans and toasted chiles, then building a complex paste that transforms into something truly special over hours of simmering.
What makes this chili stand out is the attention to detail. Toasted whole spices, dried chiles, a touch of chocolate, and even coffee all come together to create a bold, full-bodied flavor that feels restaurant-quality.
It’s the kind of dish that fills your kitchen with incredible aromas and rewards you with every spoonful.
This is not just a meal; it’s an experience in slow cooking. Perfect for a relaxed weekend or when you want to cook something memorable, this chili delivers depth, richness, and comfort in every bite.
Why I Keep Making This Chili?
I keep making this chili because it turns a simple idea into something deeply satisfying through time and technique. The process itself is enjoyable, from toasting spices to blending the chile paste, and it feels more like crafting a dish than just cooking one.
It’s one of those recipes where you can truly taste the effort that goes into it.
Another reason this chili stays in my rotation is how rewarding the final result is. The flavors are layered and complex, with just the right balance of heat, richness, and subtle sweetness.
It’s hearty enough to be a complete meal, and it only gets better the next day, making leftovers something to look forward to.
Finally, this recipe is incredibly flexible. You can adjust the spice level, tweak the sweetness, or experiment with toppings, and it still turns out great. It’s the kind of dish that evolves with you over time, making it feel personal and consistently satisfying.
Variations You Can Mess Around With
- Swap beef short ribs with chuck roast for a slightly leaner but still flavorful version.
- Adjust the spice level by reducing or increasing the number of hot chiles.
- Use beer instead of vodka or bourbon for a deeper, malty flavor.
- Add black beans or pinto beans along with kidney beans for variety.
- Skip anchovies and Marmite if preferred, though they add subtle umami depth.
Pro Tips for Perfect Results
- Toasting the dried chiles and whole spices properly enhances the overall flavor significantly.
- Browning the meat in batches ensures a deep, caramelized crust instead of steaming.
- Blending the chile paste until completely smooth creates a rich, cohesive base.
- Simmering low and slow allows the flavors to develop fully without drying out the chili.
- Letting the chili rest overnight improves the taste even further as flavors meld together.
How to Make Chili?
Ingredients
For the Chili
- 1 lb dried kidney beans
- 6 tbsp salt (for soaking)
- Assorted dried chiles (ancho, New Mexico, cascabel or árbol)
- Whole cumin seeds, coriander seeds, cloves, star anise
- 5 lbs bone-in beef short ribs
- Black pepper
- Vegetable oil
- Chicken broth
- Unsweetened chocolate
- Tomato paste
- Finely ground coffee
- Anchovy fillets
- Soy sauce
- Marmite
- Onion, garlic, fresh chiles
- Dried oregano, bay leaves
- Crushed tomatoes
- Cider vinegar
- Vodka or bourbon
- Brown sugar
- Hot sauce
For Garnish
- Scallions
- Cheddar cheese
- Sour cream
- Diced peppers or onions
- Avocado
- Crackers or chips
Equipment
- Large bowl (for soaking beans)
- Dutch oven or heavy pot
- Spice grinder or blender
- Cutting board and knife
- Wooden spoon
- Blender
Instructions
Step 1:
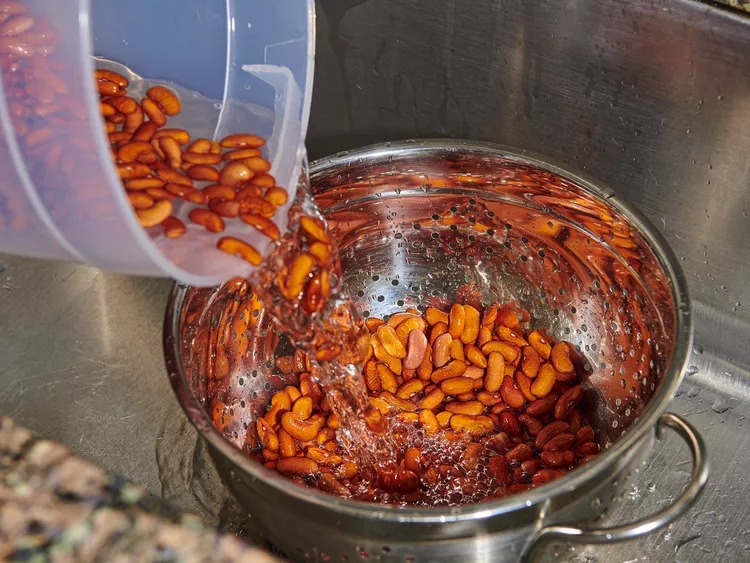
Soak the kidney beans in salted water for several hours or overnight, then drain and rinse thoroughly before cooking.
Step 2:
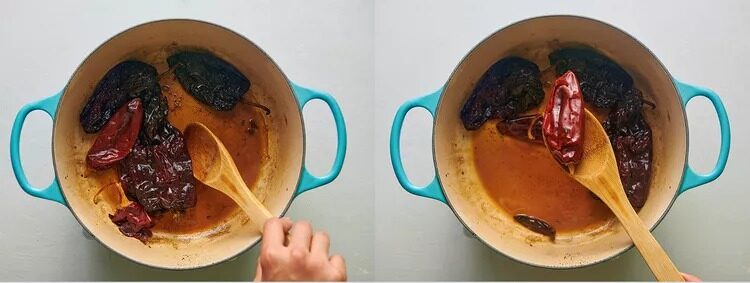
Toast the dried chiles in a hot pot until fragrant, then remove and set aside. In the same pot, toast the whole spices until aromatic and grind them into a fine powder.
Step 3:
Season the beef short ribs and brown them in batches until deeply caramelized, then set aside and reserve the rendered fat.
Step 4:
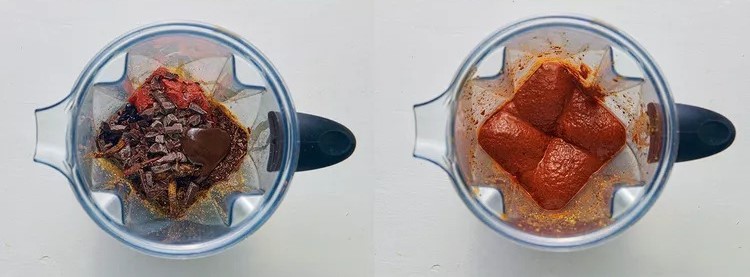
Add a portion of broth to the pot and scrape up the browned bits, then simmer with the toasted chiles until softened. Transfer this mixture to a blender along with the spices, chocolate, tomato paste, coffee, anchovies, soy sauce, and Marmite, and blend into a smooth paste.
Step 5:
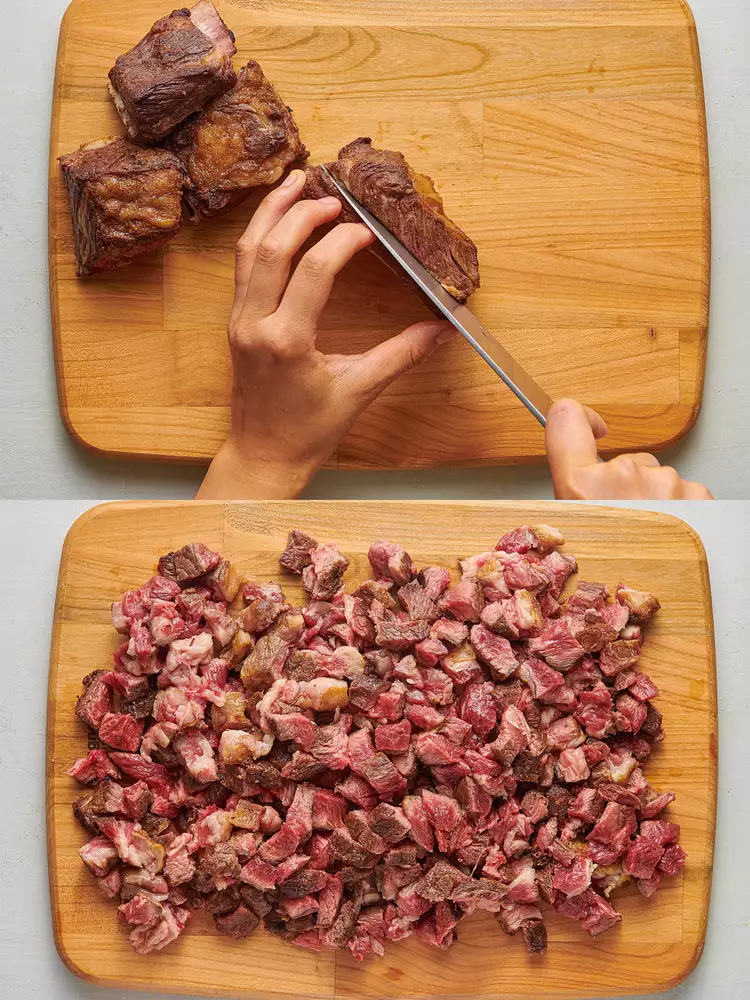
Remove the meat from the bones and chop it into chunks, keeping the bones for added flavor.
Step 6:
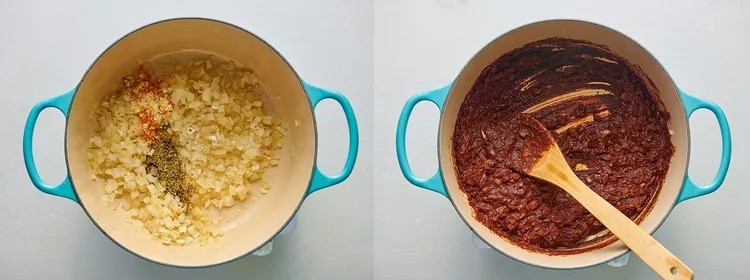
Cook onions in the reserved fat until soft, then add garlic, fresh chiles, and oregano. Stir in the chile paste and cook until thickened and fragrant.
Step 7:
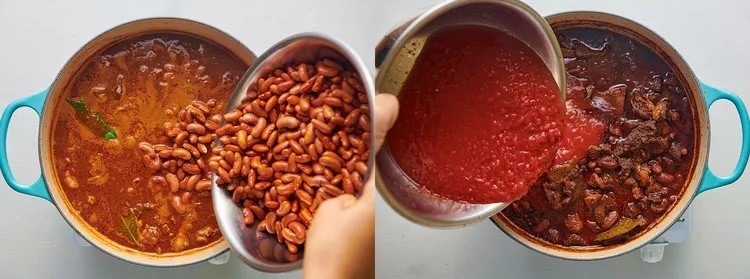
Add the remaining broth, beef, bones, and beans, then bring everything to a gentle simmer. Cook slowly until the meat and beans are tender, adding tomatoes and vinegar partway through the cooking process.
Step 8:
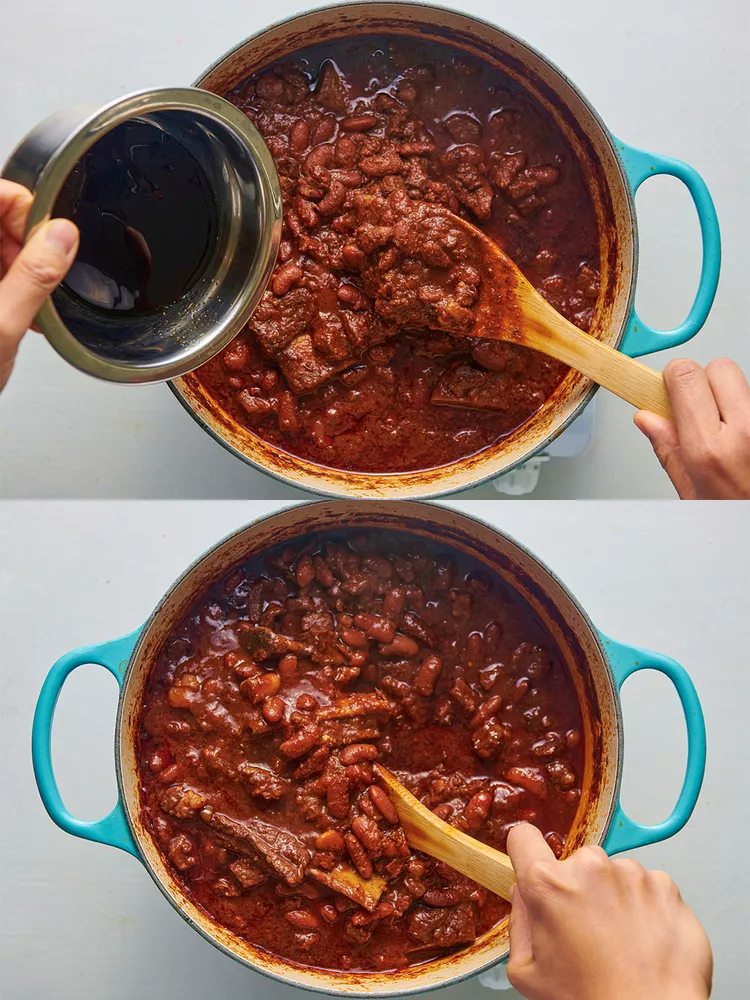
Finish the chili by removing bones and stirring in vodka or bourbon, brown sugar, and hot sauce. Taste and adjust seasoning before serving with your favorite toppings.
The Best Homemade Chili Recipe
Ingredients
Equipment
Method
- Soak the kidney beans in salted water for several hours or overnight, then drain and rinse thoroughly before cooking.
- Toast the dried chiles in a hot pot until fragrant, then remove and set aside. In the same pot, toast the whole spices until aromatic and grind them into a fine powder.
- Season the beef short ribs and brown them in batches until deeply caramelized, then set aside and reserve the rendered fat.
- Add a portion of broth to the pot and scrape up the browned bits, then simmer with the toasted chiles until softened. Transfer this mixture to a blender along with the spices, chocolate, tomato paste, coffee, anchovies, soy sauce, and Marmite, and blend into a smooth paste.
- Remove the meat from the bones and chop it into chunks, keeping the bones for added flavor.
- Cook onions in the reserved fat until soft, then add garlic, fresh chiles, and oregano. Stir in the chile paste and cook until thickened and fragrant.
- Add the remaining broth, beef, bones, and beans, then bring everything to a gentle simmer. Cook slowly until the meat and beans are tender, adding tomatoes and vinegar partway through the cooking process.
- Finish the chili by removing bones and stirring in vodka or bourbon, brown sugar, and hot sauce. Taste and adjust seasoning before serving with your favorite toppings.
Notes
Nutritional Information
| Nutrition | Value |
| Calories | 684 kcal |
| Carbohydrates | 42 gm |
| Fat | 36 gm |
| Protein | 48 gm |
Note: Nutritional values are approximate and may vary depending on ingredient size, quality, brand, location, and the proportions used. All nutritional information is calculated on a per-serving basis.
If you are following a medically restrictive diet, please consult your doctor or registered dietitian before preparing this recipe for personal consumption.
Common Mistakes to Avoid
- Skipping the soaking step for beans, which can lead to uneven cooking.
- Not browning the meat properly, resulting in less flavor depth.
- Rushing the simmering process instead of allowing flavors to develop slowly.
- Using too much liquid, which can dilute the richness of the chili.
- Forgetting to taste and adjust seasoning at the end.
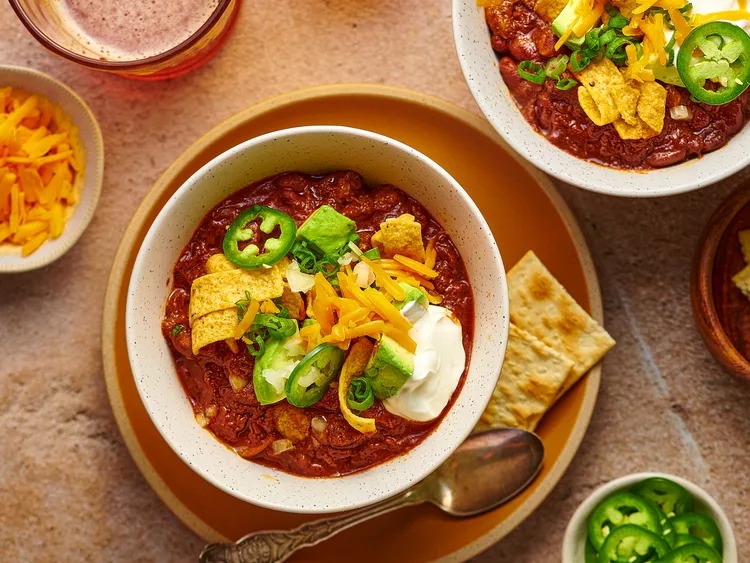
How I Like to Serve These
- Served hot in deep bowls with shredded cheese melting on top.
- With a dollop of sour cream to balance the spice.
- Topped with fresh scallions and diced onions for crunch.
- Paired with cornbread or crackers for a complete meal.
- With tortilla chips or Fritos for added texture and indulgence.
Storage / Leftovers and Next-Day Thoughts
- Store in an airtight container in the refrigerator for up to four days.
- Reheat gently on the stovetop, adding a splash of water if needed.
- Flavors deepen overnight, making leftovers even better.
- Freeze in portions for up to three months for easy meals later.
- Thaw in the refrigerator before reheating for best texture.
FAQs
Can I use canned beans instead of dried beans?
Yes, but the texture and flavor may be slightly different.
Is this chili very spicy?
It can be adjusted based on the type and amount of chiles used.
Can I make this in a slow cooker?
Yes, after preparing the base, it can be transferred and cooked slowly.
Do I need all the special ingredients like anchovies and Marmite?
They add depth, but you can omit them if preferred.
Why does chili taste better the next day?
The flavors have more time to blend and develop, enhancing the overall taste.